Fraud Expert Checklist
1. Introduction
There is nothing worse than dealing with online fraud. That is why we take fraud very seriously at ePDQ. Our Fraud Expert Checklist offers you more control and insights to effectively take your fraud protection strategy to the next level.
Fraud Expert Checklist is able to:
- Create rules on a checklist that has been adapted uniquely to your business and industry needs! These rules help to identify potentially risky transactions. Once these transactions have been identified, you decide what action to take.
- Take advantage of data intelligence to detect real-time fraud threats.
- Provide you a second expert opinion to make faster and more accurate decisions.
The best part about our automated solution is that it saves you precious time and allows you to process most of your transactions quickly while keeping your customer happy!
2. Before we begin
To get started, make sure that Fraud Detection Module Advanced Checklist (ID: CAP 1) has been activated. You can do this by going to Configuration > Account > Your options in your account.
3. Manage 3DS settings
3-D Secure (3DS) is an anti-fraud protocol designed to enhance security for both you and your customers. Learn more about 3DS in our FAQ.
Define 3DS settings

Once your fraud subscription is active, you can now configure your 3DS settings. Go to Advanced > Fraud Detection. 3DS has to be configured individually for each payment method. Under 3-D Secure, select a payment method by clicking on EDIT.
You will see a list of actions that you can choose from.
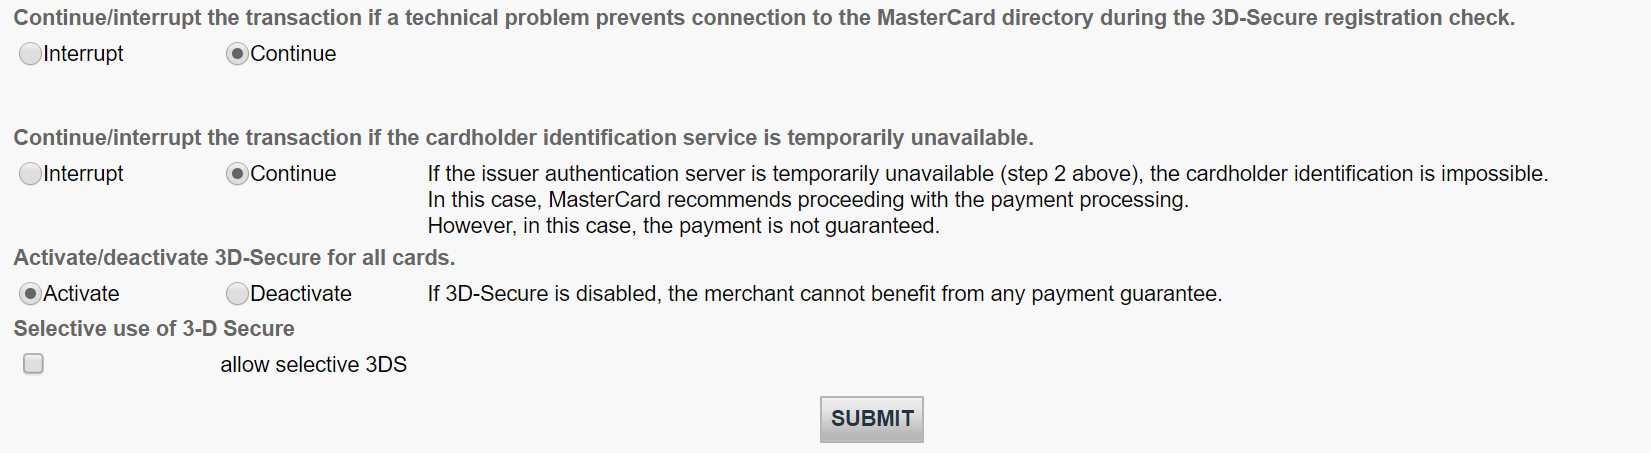
The table below provides an overview on actions listed on the page and what they mean.
| Actions | Explanation |
|---|---|
|
You can either continue or interrupt the transaction if a technical problem prevents connection to the respective acquirer during the 3D-Secure registration check. |
You may want to do configure this option in case we cannot connect to the 3DS directory of the related scheme/card brand. |
|
You can either continue or interrupt the transaction if the cardholder identification service is temporarily unavailable. |
You may want to configure this option in case the 3DS verification URL is not working. |
|
You can either activate or deactivate 3D-Secure for all cards.
|
If you decide to deactivate 3DS, it will not be rolled out at all. |
|
You can process 3D-Secure depending on the Global Fraud Score. |
3DS will be processed based on your fraud settings and our Fraud Expert assessment if it has been activated. |
4. Set conditions for Merchant Fraud lists
Merchant Fraud lists are lists that allow you to set conditions for your payments. For example, you may want to block illegitimate transactions based on their IP addresses or even the card’s country of issue. In this chapter, you will learn how to manage these lists.
There are three types of lists.
- Whitelists allow you set conditions for when a transaction should be accepted.
- Blacklists allow you to set conditions for when a transaction should be blocked.
- Greylists allow you to set conditions for when a transaction should be reviewed or undergo another process.
- The lists
- How matches are applied by the Merchant Fraud Rules
Only then will your settings take effect
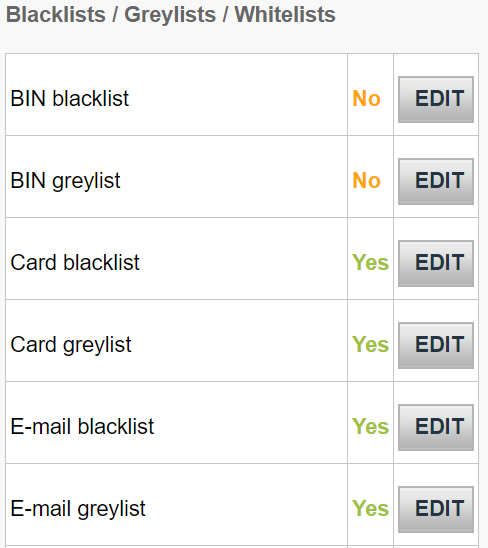
View lists
View these lists by going to Advanced > Fraud Detection in the your account. Under Blacklist / Greylist / Whitelist, select an item that you would like to configure and click EDIT.
Manage whitelists
You can use whitelist to set conditions for when transactions should be accepted. Whitelists overrides blocking (blacklist) and review (greylist) settings if a match has been detected.
Depending on the action that you choose to take, you might need to send some parameters with the transaction to our platform. Below is an overview of the list types (i.e the conditions you can set), what they mean and parameters that would need to be sent.
| List type | Explanation | Parameter to be sent |
|---|---|---|
|
IP address whitelist |
Our system will accept both specific IPs or IP ranges according to the formatting a.b.c-d.0-255 or a.b.c-d.* or a.b.c.d-e. |
REMOTE_ADDR |
|
Unique customer identifier whitelist |
Customer Unique Identifier is an identifier allocated to your customer such as their name, client number, email address. |
CUID |
|
Email whitelist |
Add a range of email addresses or if you need to add all email addresses from the same domain (Example: john@abc.com), add an asterisk ‘*’ symbol in front of the @ sign. (Example: *@abc.com) |
|
Manage blacklists
Blacklists apply blocking or review if a match is detected.
Depending on the action that you choose to take, you might need to send some parameters with the transaction to our platform. Below is an overview of the list types (i.e the conditions you can set), what they mean and parameters that would need to be sent.
| List type | Explanation | Parameter to be sent |
|---|---|---|
|
Card Blacklist |
to add items you will need the full credit card / bank account (For Direct debits) number. |
CARDNO |
|
BIN blacklist |
A Bank Identification Number (BIN) consists of the first six digits of a credit card linked to an issuer in a specific country. This allows you to block all credit cards that share the same BIN. |
CARDNO |
|
IP blacklist |
Our system will accept both specific IPs or IP ranges according to the formatting a.b.c-d.0-255 or a.b.c-d.* or a.b.c.d-e. |
REMOTE_ADDR |
|
E-mail blacklist |
Add a range of email addresses or if you need to add all email addresses from the same domain (Example: john@abc.com), add an asterisk ‘*’ symbol in front of the @ sign. (Example: *@abc.com) |
|
|
Name blacklist |
Generates two versions of the name: the “Cleaned name” and the “Partial match” |
CN |
|
Phone blacklist |
Generates two versions of the name: the “Cleaned number” and the “Partial match” |
OWNERTELNO |
|
Generic blacklist |
Personalise this list with any data that is desirable |
GENERIC_BL |
Manage greylists
Greylists allow you to set conditions for when a transaction should be reviewed if a match is detected.
Depending on the action that you choose to take, you might need to send some parameters with the transaction to our platform. Below is an overview of the list types (i.e the conditions you can set), what they mean and parameters that would need to be sent.
| List type | Explanation | Parameter to be sent |
|---|---|---|
|
Card greylist |
to add items you will need the full credit card / bank account (For Direct debits) number. |
CARDNO |
|
BIN greylist |
A Bank Identification Number (BIN) consists of the first six digits of a credit card linked to an issuer in a specific country. This allows you to block all credit cards that share the same BIN |
CARDNO |
|
IP greylist |
Our system will accept both specific IPs or IP ranges according to the formatting a.b.c-d.0-255 or a.b.c-d.* or a.b.c.d-e. |
REMOTE_ADDR |
|
E-mail greylist |
Add a range of email addresses or if you need to add all email addresses from the same domain (Example: john@abc.com), add an asterisk ‘*’ symbol in front of the @ sign. (Example: *@abc.com) |
|
|
Name greylist |
Generates two versions of the name: the “Cleaned name” and the “Partial match” |
CN |
|
Phone greylist |
Generates two versions of the name: the “Cleaned number” and the “Partial match” |
OWNERTELNO |
|
Generic greylist |
Personalise this list with any data that is desirable |
GENERIC_BL |
Add new items to a list
If you would like to add items to one of the list types above, select the respective list type and click EDIT.
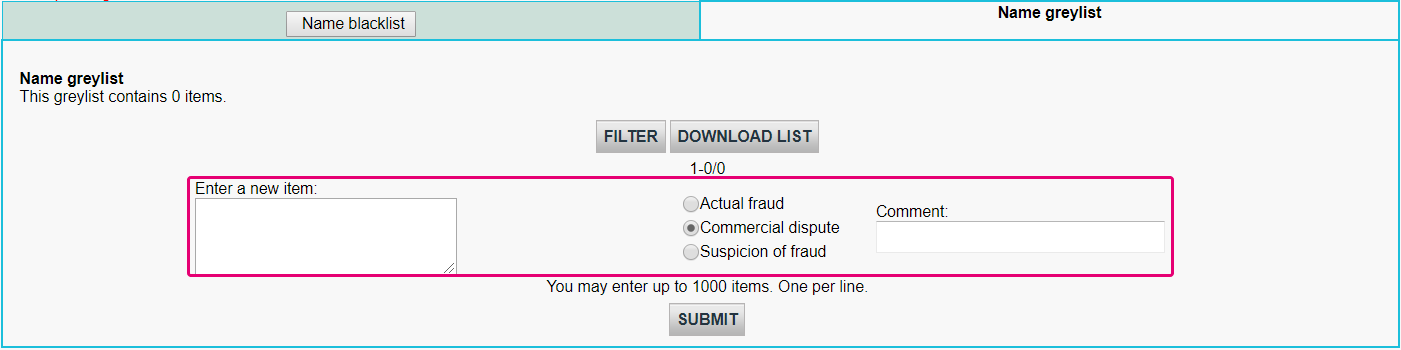
To add items to a list,
- Enter data in the Enter the item
- Select either Actual Fraud / Commercial Dispute / Suspicion of Fraud.
- Optional: Add some information in the Comment field if you have any.
Manage existing list items
If you would like to manage items in a list, you can either:
- Delete: Remove one or more items by flagging All
- Fraud type: Modify the original entry to FRA (Actual Fraud) / COM (Commercial Dispute) / SOF (Suspicion of Fraud).
- Comment:Delete or change the original comment of your item by clicking on "..."
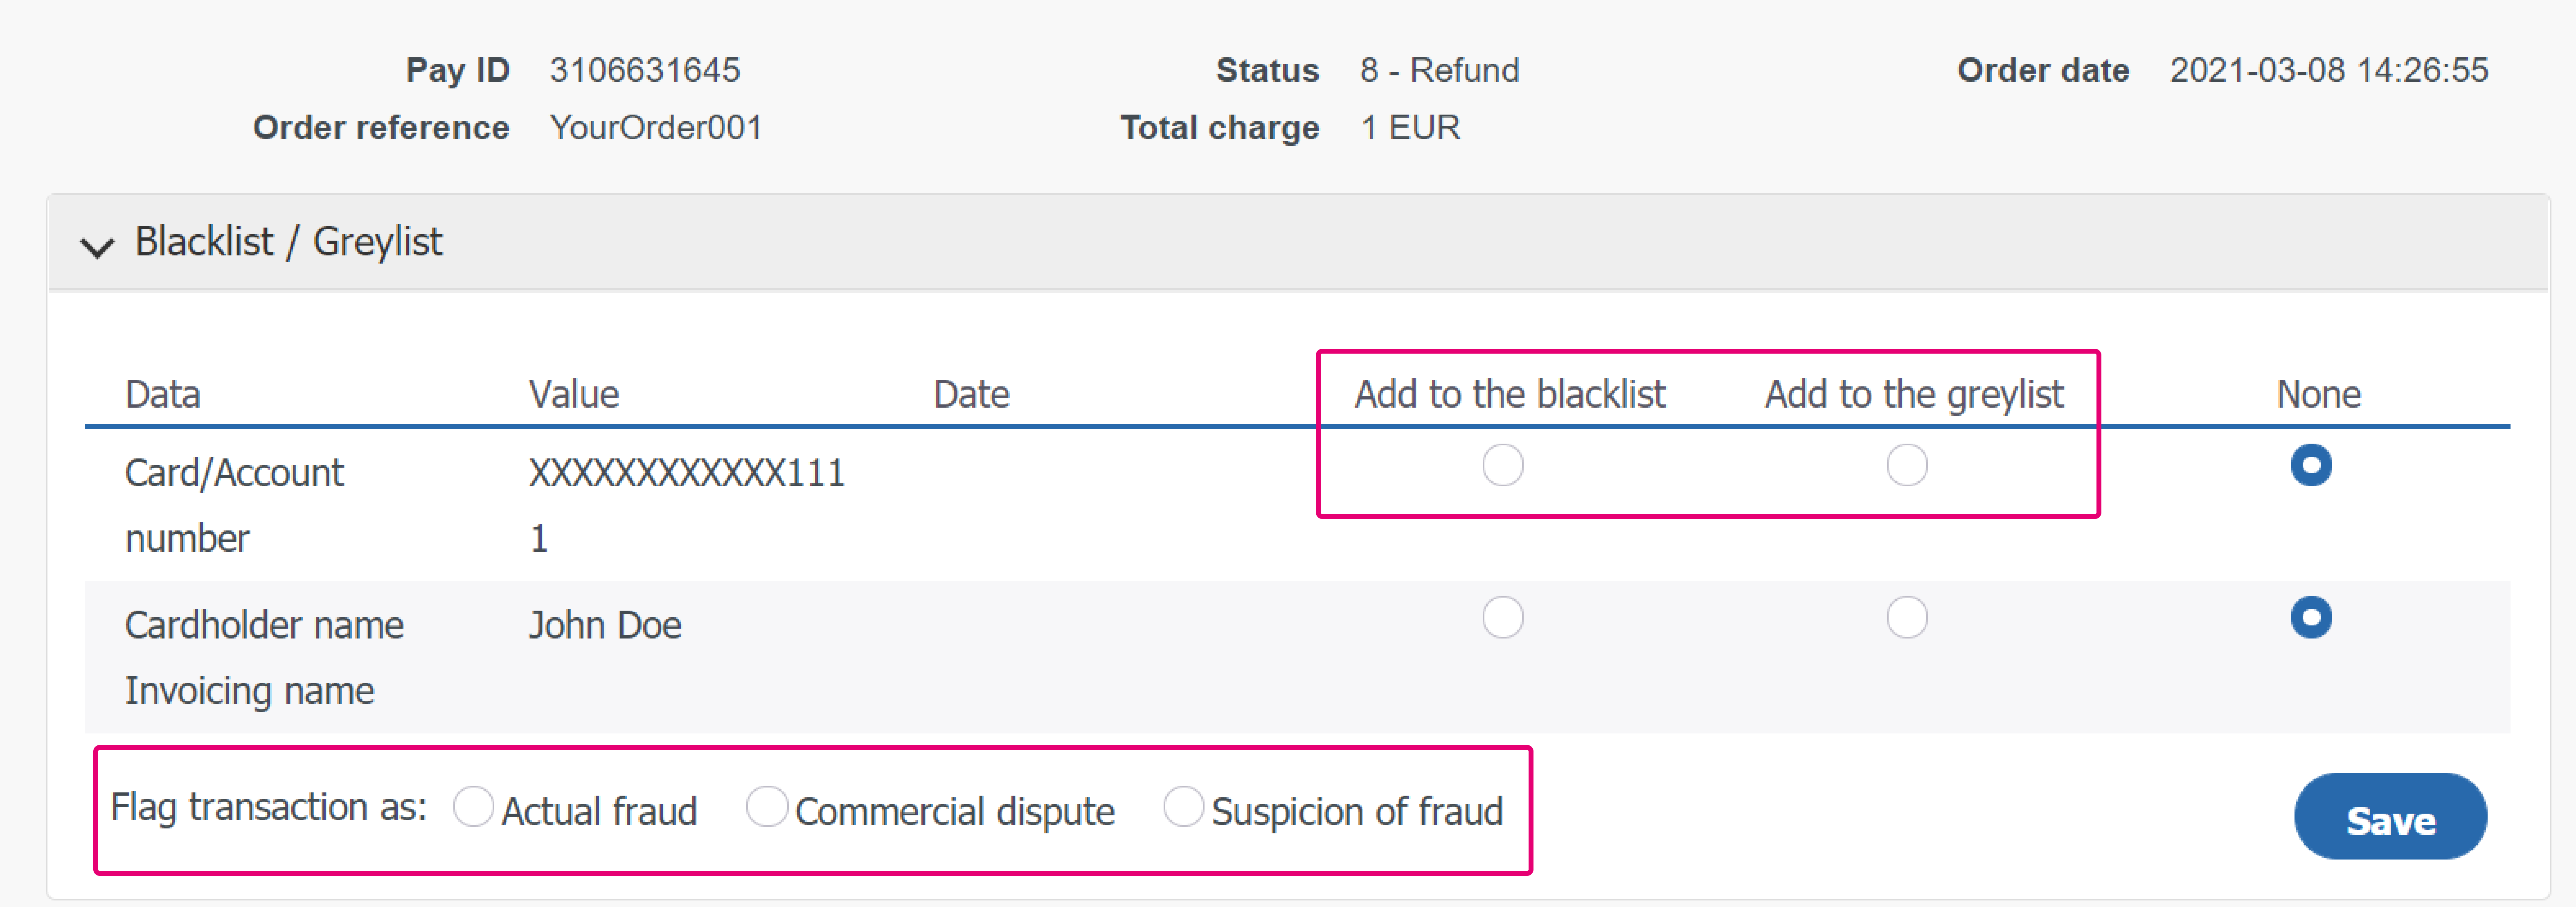
Our platform also allows you to put already processed transactions to this list. To do so, follow these steps:
- Log in to the Back Office. Go to Operations > View transactions and look up the transaction
- In the table displaying all maintenance operations for this transaction, click on any Pay ID button
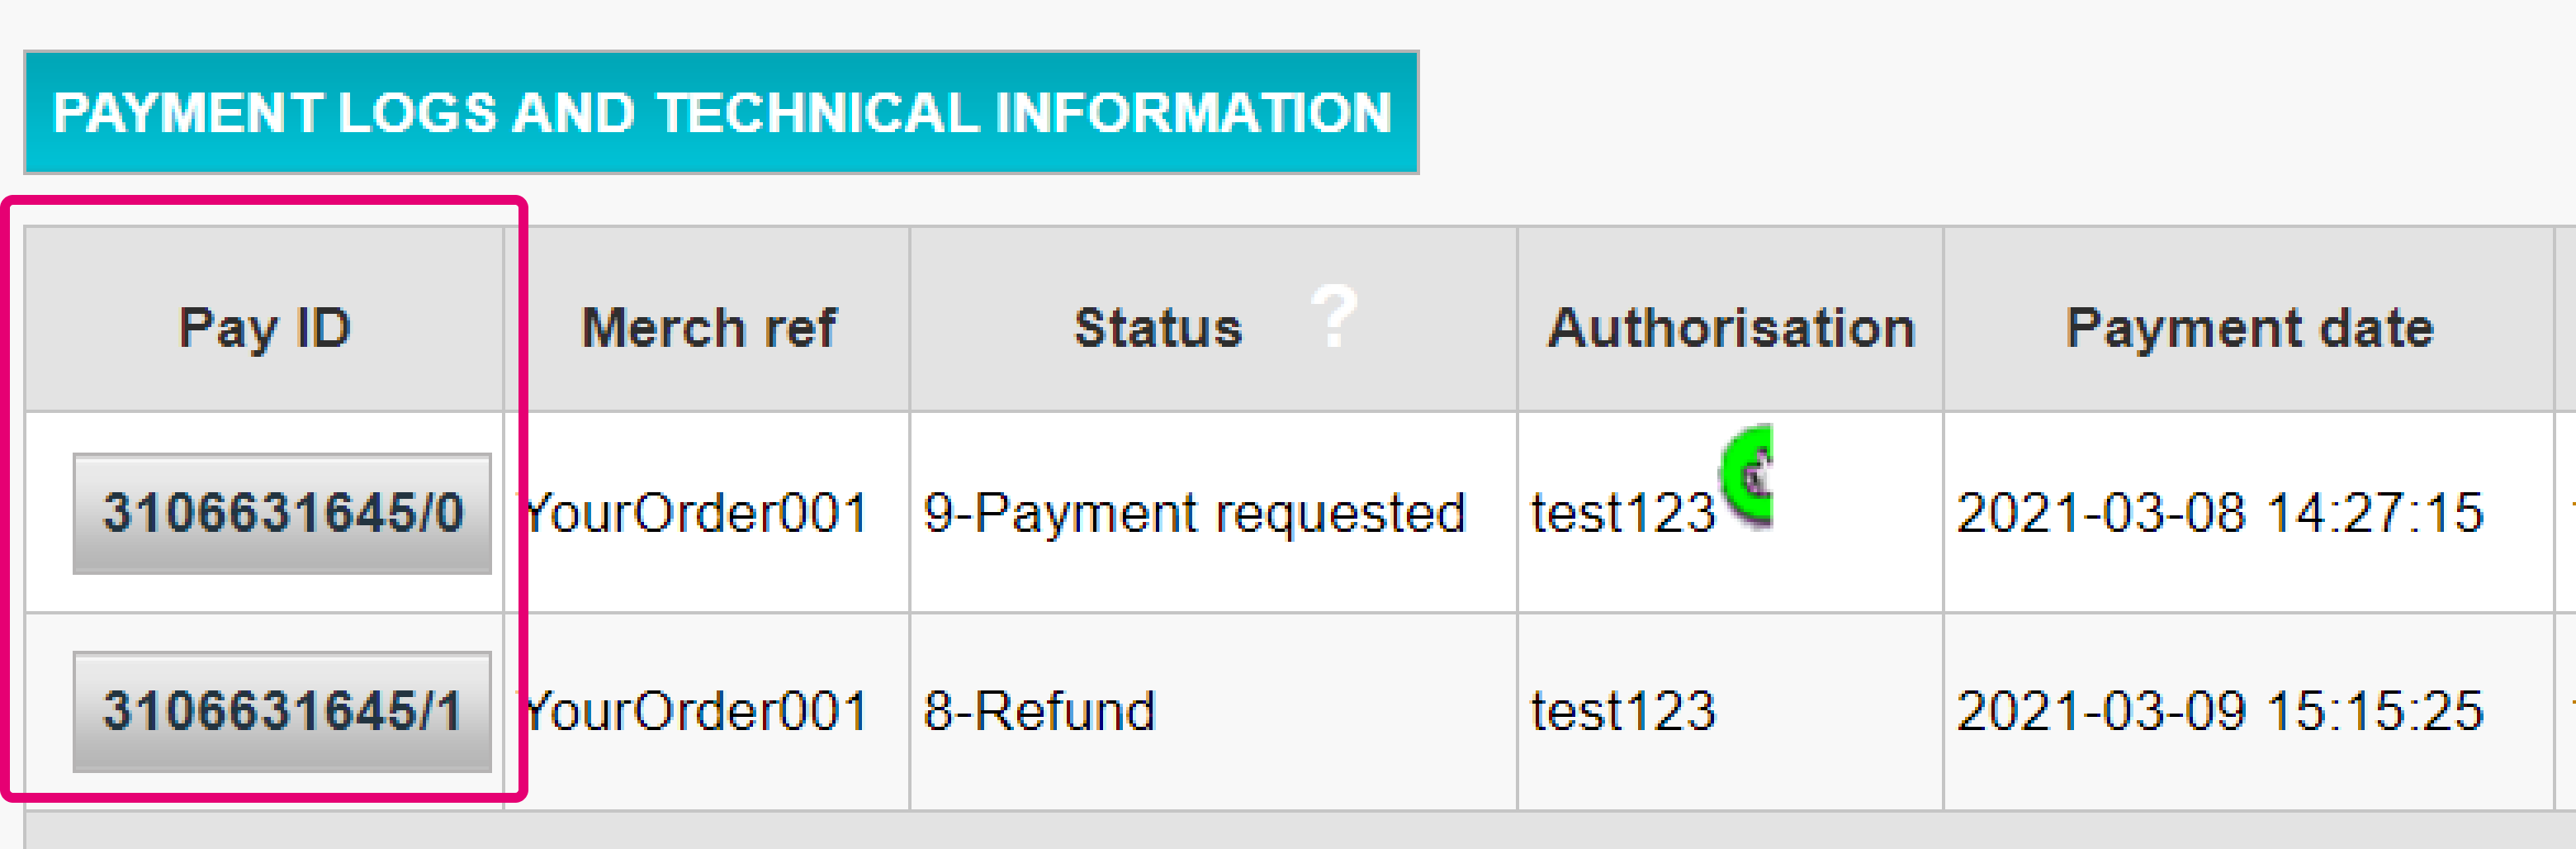
- On the maintenance operation overview page, click on the “DISPUTE” button
- In the table, select either “Add to the blacklist” / “Add to the greylist” for any of the selectable transaction parameters. Flag then transaction as either "Actual fraud” / “Commercial dispute" / "Suspicion of fraud". Confirm your selection by clicking on the "Save" button


5. Set up Merchant Fraud checklist
The principle of a fraud checklist is to match each transaction with a list criteria based on various parameters and their respective weighting in a risk assessment. This means that depending on the individual settings, you can define one of the following actions to be applied:
- None (the criteria is ignored for fraud assessment): the transaction is accepted, provided that the acquirer / issuer will not reject it for any other reason
- Review: A 3DS check will be performed. If the check fails, the transaction will be blocked. If it is successful, we will go for the authorization
- Block: The transaction will be blocked
This chapter will teach you how you can set and manage this checklist in your account.
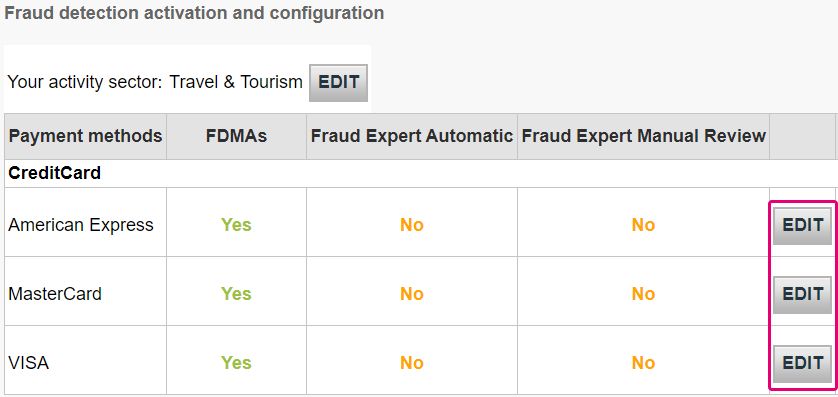
View your checklist by going to Advanced > Fraud Detection in your account. Under Fraud detection activation and configure, select a payment method that you would like to configure and click EDIT.
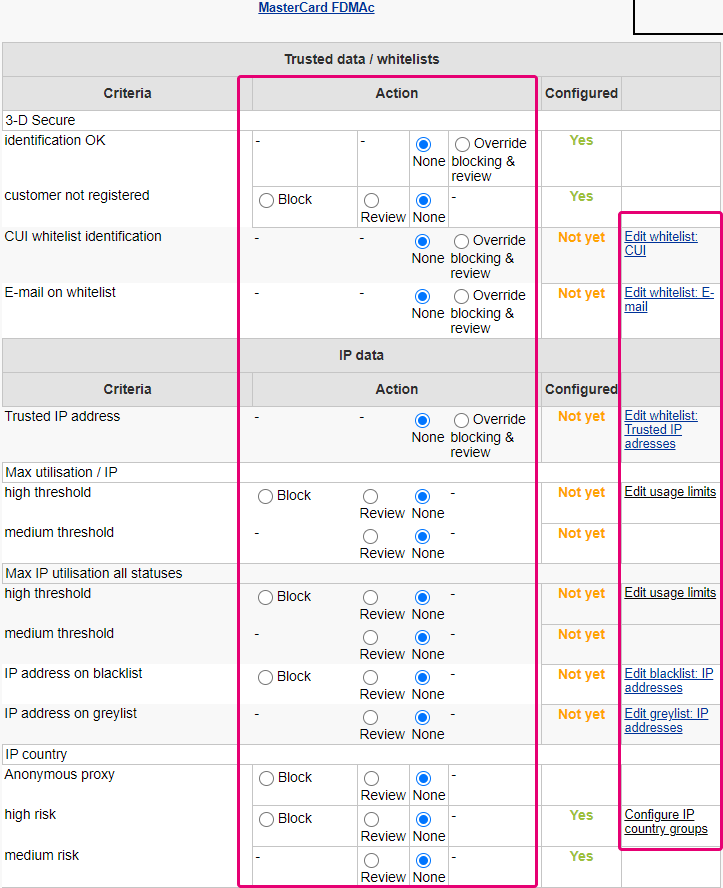
On the page, you will see criteria that you can define freely. Each criterion requires you to define one or more of the following settings:
- None (the criteria is ignored and no assessment will be made)
- Review (a 3DS check will be performed)
- Override blocking / review
- Block
- Whitelist / greylist / blacklist management
- Edit usage limit
Depending on the criteria that you wish to define, you might need to send some parameters with the transaction to our platform. Below is an overview of the most important criteria, their respective parameters and our possible settings to define to effectively optimise your fraud protection.
| Category | Criteria | Actions | Parameter(s) to be sent |
|---|---|---|---|
|
Trusted data / whitelists |
3-DS Secure identification OK |
· Block / Review / · Edit whitelist: CUI · Edit whitelist: E-mail |
- |
|
CUI whitelist identification |
CUID |
||
|
E-mail on whitelist |
|
||
|
Card data |
Card country high / medium risk |
· Review |
CARDNO |
|
Max amount / card high / medium threshold |
· Block / Review · Edit usage limits |
CARDNO |
|
|
IP data |
IP country high / medium risk |
· Configure IP country groups · Block / Review |
REMOTE_ADDR |
|
Anonymous proxy |
Block / Review |
REMOTE_ADDR |
|
|
IP cty differs from CC cty |
Block / Review |
REMOTE_ADDR / CARDNO |
|
|
Unauthorised card country / IP country combination high / medium risk |
· Edit IP/CC country pairs · Block / Review |
REMOTE_ADDR |
|
|
Max utilisation / IP |
· Block / Review · Edit usage limits |
REMOTE_ADDR |
|
|
Contact data |
Max e-mail utilisation |
· Block / Review · Edit usage limits |
REMORE_ADDR |
|
Address data |
Invoicing address different to delivery address |
Review |
ADDMATCH |
|
Miscellaneous data |
Number of different countries |
Block / Review |
- |
|
Amount lower / higher than range |
· Edit min max amount · Block / Review |
AMOUNT |
|
|
Time of order high - / medium risk period |
· Review · Edit risky periods |
- |
|
|
Data in generic blacklist / greylist |
· Block / Review · Edit blacklist / greylist: generic data |
GENERIC_BL |
|
|
Shipping Method high / medium / low risk |
· Block / Review · Edit risky Shipping Methods |
ECOMSHIPMETHODTYPE |
|
|
Shipping Method Details High / medium / low risk |
· Block / Review · Edit risky Shipping Method Details |
ECOMSHIPMETHODDETAILS |
|
|
Product Category High / medium / low risk |
· Block / Review · Edit risky Product Categories |
ITEMFDMPRODUCTCATEGx |
|
|
Time to Delivery |
· Strictly less than X hours · Block / Review |
ECOM_SHIPMETHODSPEED |
|
|
Automatic address verification by the acquirer |
result OK / KO |
Block (Review if in Direct Sale) / Review |
OWNERZIP |
|
Card verification code check |
result OK / KO |
Block (Review if in Direct Sale) / Review |
CVC |
Configure travel data (for airline industry only)
If your business model involves handling airline data, you will also need to send the following parameters need to be sent to us along with the transaction to be taken into consideration.
| Parameters to be sent |
|---|
|
AIPASNAME |
|
AIEXTRAPASNAME*XX* |
|
AIORCITY*XX* |
|
AIORCITYL*XX* |
|
AIDESTCITY*XX* |
|
AIDESTCITYL*XX* |
|
AISTOPOV*XX* |
|
AIFLDATE*XX* |
For more information on these parameters, you can refer to our Parameter Cookbook in your account. Go to Support > Integration and User Manuals > Technical Guides to access it!

Apply list items as Merchant Fraud Rules
Once you have managed items in your white/grey/black lists, you need to instruct our platform once a match occurs.
To do so, follow these steps:
- Log in to the Back Office. Go to Advanced > Fraud Detection. Select the payment method for which you want to configure Merchant Fraud Rules via "Fraud detection activation and configuration"
- Select any of the settings in column "Action" to define how a match should impact the scoring of the transaction in question
- You may edit the list corresponding to the setting by selecting the option "Edit list xxx" on the right hand-side of the setting
Identify fraud with Device Fingerprinting
Device Fingerprinting is a technology that enables us to uniquely identify a device used during a transaction. This means that if fraudsters use the same device for different transactions, our system will be able to detect this and block the transaction immediately. We use the parameter tag, DEVICEID to identify the device used for each transaction.
Depending on your integration with us, there are some actions that you can take to activate Device Fingerprinting.
- If you are using our eCommerce integration, this data will be captured on our payment page. Thus, this is done automatically for you.
-
If you are using our DirectLink or FlexCheckout integration, you will need to add a tracking code to your integration. The code will need to be added into the header of one of your webpages which will be loaded when the cardholder’s device visits the site. We recommend adding it to your payment page.The code is in HTML and consists of CSS, Javascript and Flash:
<script type="text/javascript" asycn ="true" src ="https://elistva.c om/api/script.js? aid=10376&sid=XXXXXXXXXXXXXXXXXXXXXXXXXXXXXXXX"></script> <noscript><p style="background:url(//elistva.c om/api/assets/c lear.png? aid=10376&sid=XXXXXXXXXXXXXXXXXXXXXXXXXXXXXXXX)"></p></noscript> <object type="application/x-shockwave-flash" data="//elistva.c om/api/udid.swf? aid=10376&sid=XXXXXXXXXXXXXXXXXXXXXXXXXXXXXXXX" width="1" height="1"> <param name="movie" value="//elistva.c om/api/udid.swf? aid=10376&sid=XXXXXXXXXXXXXXXXXXXXXXXXXXXXXXXX" /> </object>
You will need to update the XXXXXXXXXXXXXXXXXXXXXXXXXXXXXXXX in the code snippet with a unique user session identifier in MD5 format.
This HTML code is associated with a unique temporary and random session identifier (SID), which is generated by you as described in the table below.
| Parameter(s) to be sent | Explanation | Format |
|---|---|---|
| sid |
SID is the unique identifier of a user session. The c concatenation of the values of respectively the PSPID and ORDERID are calculated in the MD5 format, resulting a 32-digit hexadecimal hash string. |
Série de dièses hexadécimale à 32 chiffres 3711c 3a8 |
| aid | The ID of Tracker Application Account | Valeur fixe : 10376 |
Note: This feature will only work when a Fraud Expert Scoring category (Green, Orange, or Red) is successfully returned by Fraud Expert. Learn more about Fraud Expert below.
6. Manage Fraud Expert settings
Fraud Expert is a machine learning system that provides you with a second expert opinion through an additional layer of security. It uses the pooled data of historical transactions from all our customers across various industries and sectors.
The data is then used to create accurate fraud predictions and evaluate the legitimacy of every transaction that passes through your webshop with these predictions. This means that transactions will not only be verified with the rules that you have manually set, but it will also go through an additional barrier of protection. Fraud Expert is responsive. As new customer transactions are made, Fraud Expert continuously adapts its predictions and responds to new threats in the payment ecosystem.
What exactly can it do for you? It can:
- Detect fraud at an earlier stage and ensure that your business is protected from complex fraud attacks from the get-go!
- Remove human error and prevent the rejection of valid orders.
- Outsource the manual review of dubious transactions as well as freeze dubious transactions that you want to review yourself.
This chapter will teach you how you can activate and configure Fraud Expert settings.
Set activity sector and review modes
Firstly, you will need to define your activity sector. Based on your activity sector, our Fraud Expert tool will formulate predefined scoring rules and criteria that is for your industry. Go to Advanced > Fraud Detection > Your Activity Sector. Click EDIT.
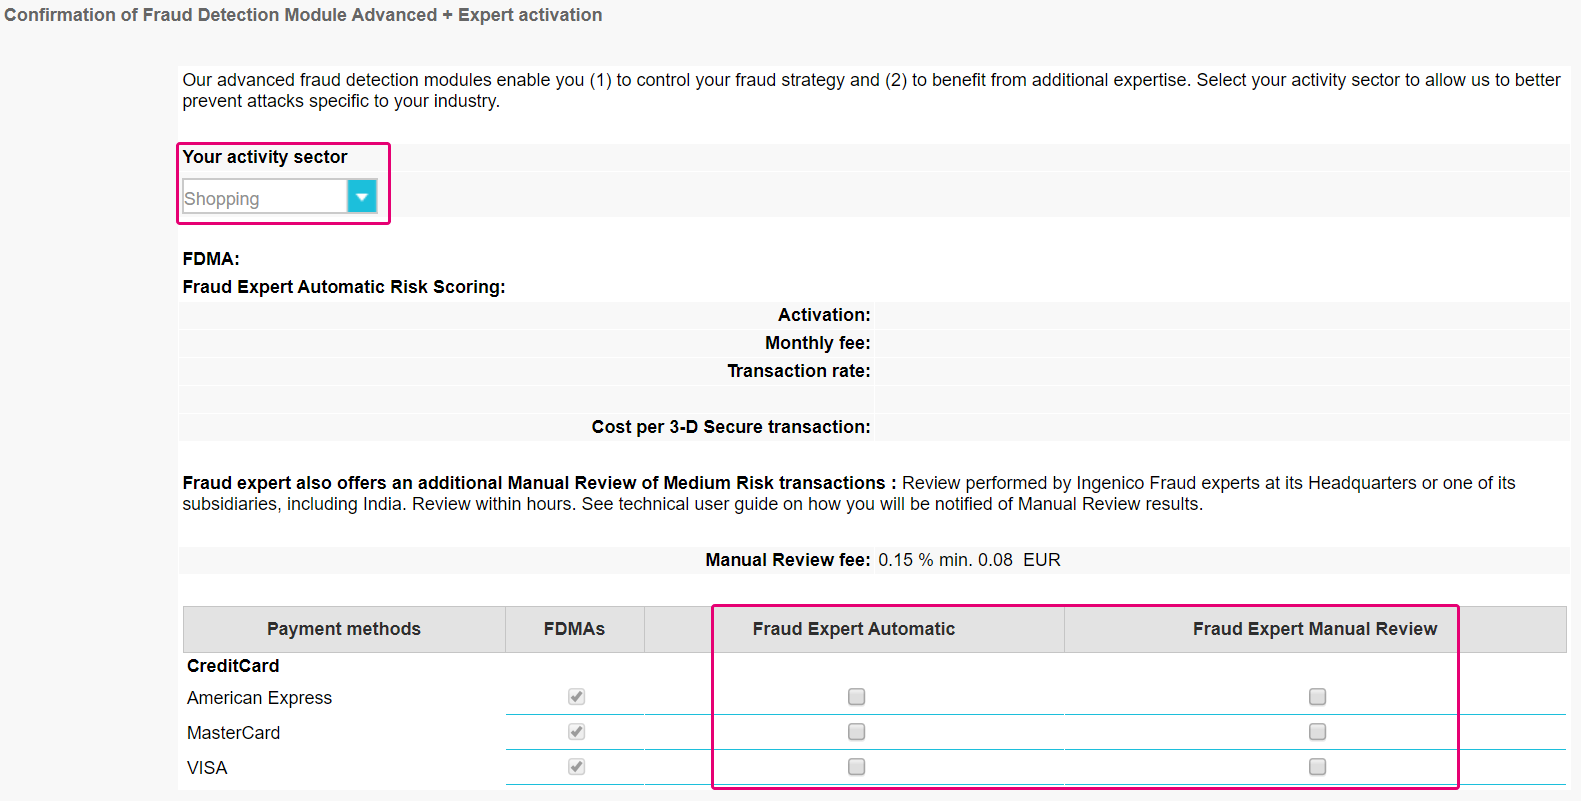
On the same page, you can also decide if you want to automate or manually review your transactions. You can do so for all your payment methods. This means that if you select:
- Automatic: Transactions that go through your webshop will either be released or blocked automatically.
- Manual Review: Transactions that go through your webshop will be manually reviewed by experts at ePDQ.
Define Fraud Expert behavior
Once you have defined your activity sector, we can now define what actions can be taken with Fraud Expert. Transactions that go through your webshop will be defined by a Global Fraud Score.
A Global Fraud Score is a score (either green, orange or red) made up of the combination of your own configuration (also known as FDMA checklist) that you have set in Chapter 4 and the Fraud Expert. By taking these two factors into consideration, a Global Fraud Score is created for each transaction that passes through your webshop.
- Green: Transactions with a green score are considered to have low fraud risk. They are considered to be safe and will be accepted, provided that the acquirer/issuer will not reject it for any other reason.
- Orange: Transactions with an orange score are considered to have medium fraud risk. This means that some rules were triggered and the transaction might be suspicious. We recommend that you verify them once more before dispatching your services/goods to the customer.
- Red: Transactions with a red score are considered to have high fraud risk and will be blocked.
To start, go Advanced > Fraud Detection. Select a payment method that you want to configure, and click EDIT.
Once a payment method has been selected, you will see two tabs on the top of the screen. Select the Fraud Expert tab as shown in the screenshot.
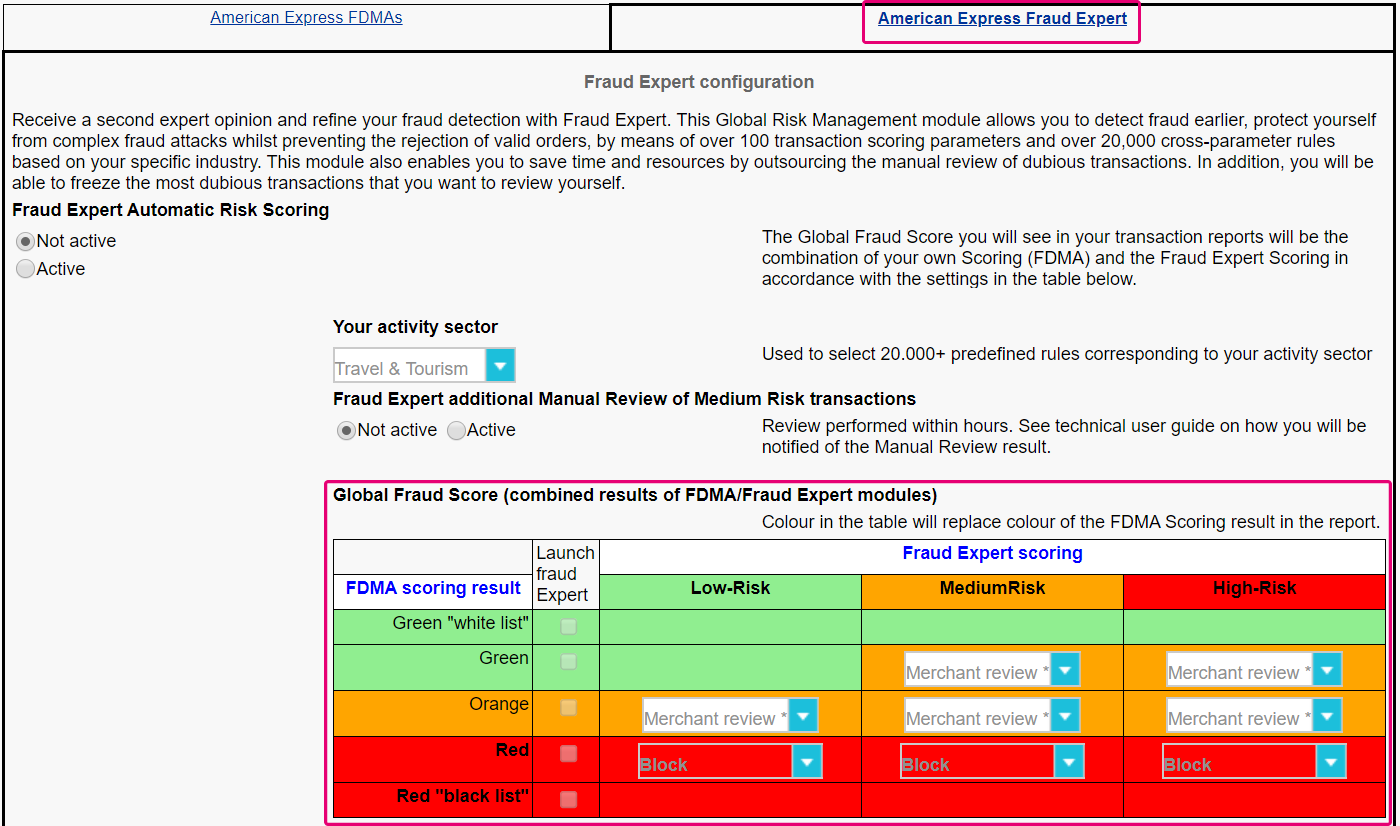
On the page, you will see your Global Fraud Score matrix. You can define what action or behavior that you would you like to do, based on the Global Fraud Score of your transactions.
For instance, a transaction may receive a green score (low fraud risk) based on your FDMA settings (as you had defined in Chapter 4). However, our Fraud Expert system may score the same transaction as red (high fraud risk). You can then decide what action you want to take if such a scoring is denoted on a transaction.
Manage orange transactions
As we had stated earlier, transactions that have an orange score are considered to have medium fraud risk. With the Global Fraud Score matrix, you can “freeze” orange transactions for manual review. This means that you have the opportunity to review the transactions yourself before making a final decision.
Recommendation: We recommend that you do not wait to take a decision. If no action is made after the freeze period is over, the payment will automatically be processed!

You can decide the length of your freeze period by going to the Fraud Expert tab of each payment method.
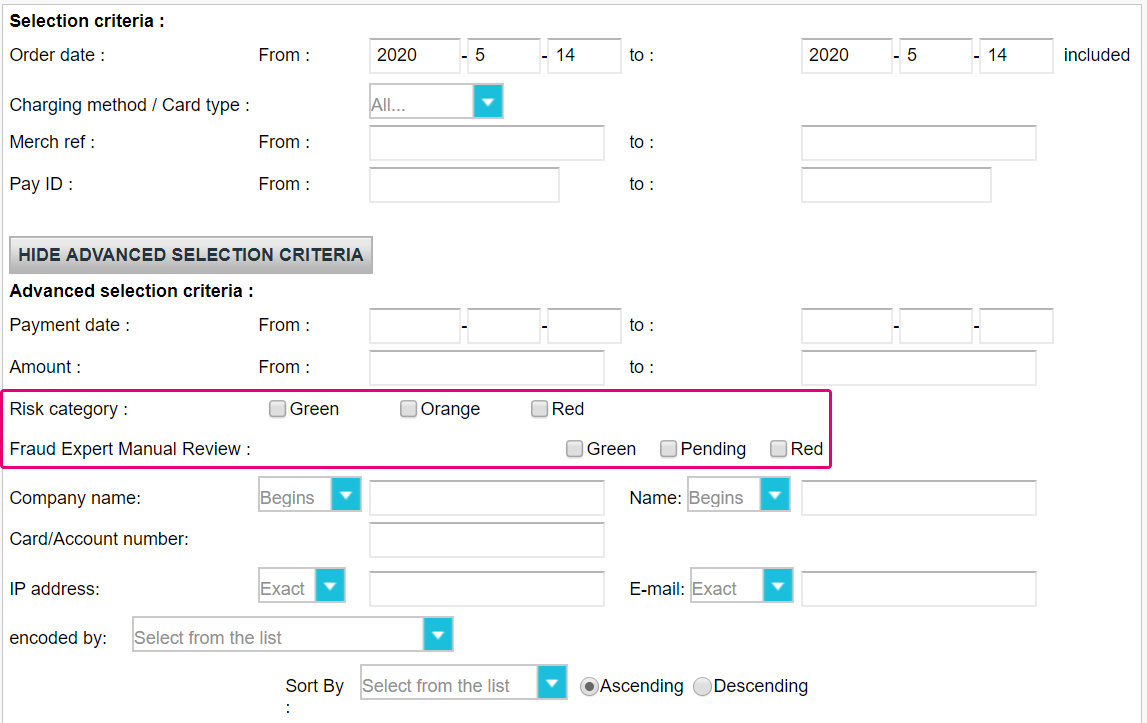
Once you have decided on a freeze period, you can view all impacted orange transactions by going to Operations > View Transactions. Select ADVANCED SEARCH CRITERIA. Look up the transactions with the filter Risk Category and Fraud Expert Manual Review.
In the list of transactions displayed, you will see symbols under the Global Fraud Score column.
- Hand symbol: Click on this symbol to either release or block transactions.

- Hourglass symbol: Transactions with this symbol are awaiting to be released or blocked based on the results of our Fraud Expert review.
